
Ozone Machine Factory: Inside a Leading Manufacturer's Production Process
2026-10-03
Most people never see the inside of an ozone machine factory—they just trust that the unit will work when it matters. Step inside LUFUTATECH's production floor, and that trust becomes a visible, repeatable process. This isn't just assembly; it's a quiet obsession with precision, testing, and the small decisions that separate a reliable machine from a disposable one.
From Raw Ceramic Tubes to Precision Electrodes
Raw ceramic tubes arrive with rough surfaces and uneven dimensions. The first step involves cutting them to length with diamond saws, then grinding the outer diameter and bore to achieve initial concentricity. Even at this stage, minor deviations can affect electrode performance later, so operators check roundness and wall thickness frequently.
Precision comes from a series of fine machining passes. The tubes are mounted on specialized mandrels and lapped with progressively finer abrasives until surface roughness drops below a few microinches. Conductive layers—often platinum, gold, or silver—are then applied through screen printing, sputtering, or chemical deposition. The exact method depends on the electrode's intended use, but every approach demands clean surfaces and controlled atmosphere to ensure strong adhesion.
Final electrodes are not just ceramic tubes with metal coatings; they are engineered components with tightly specified electrical resistance, active surface area, and mechanical strength. Each batch undergoes automated testing for conductivity and dimensional stability, and any unit outside tolerance is rejected. This step-by-step refinement, from rough stock to finished part, is what makes reliable precision electrodes possible in sensors, medical devices, and industrial analyzers.
Hand-Built Corona Cells on a Quiet Assembly Floor
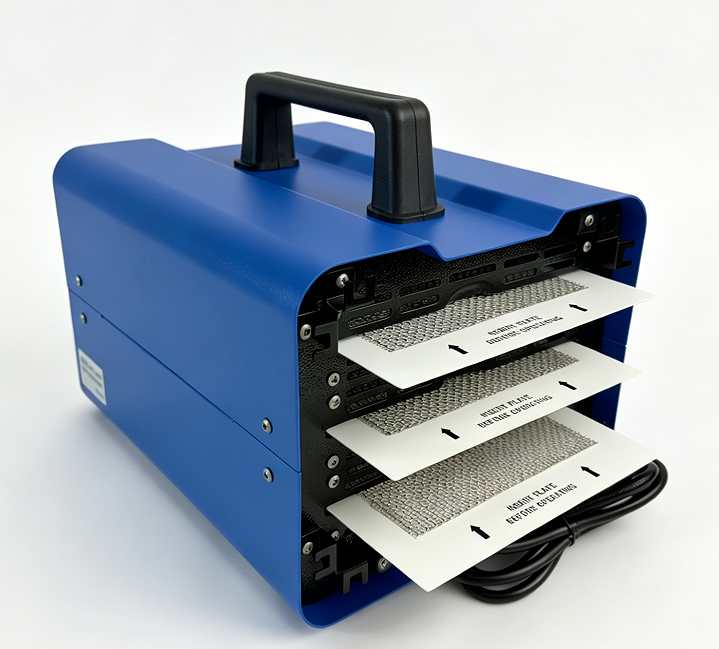
The assembly floor stays nearly silent, save for the occasional click of a torque wrench or the soft hiss of compressed air. Each corona cell is put together by hand, one electrode at a time. Technicians work at individual benches lined with felt mats, positioning wire grids and ceramic insulators without rush. The absence of conveyor noise or automated chatter means you can hear the faint scrape of a fingernail against a housing seam when a piece needs adjustment.
Small batches move from station to station on wheeled carts, pushed by people rather than belts. Before a cell leaves the floor, someone runs a fingertip along the inner radius of the shell, checking for burrs that machines would miss. The quiet isn’t just a byproduct of low volume—it’s a deliberate choice. It lets builders catch the subtle feel of a misaligned lead or a gasket that didn’t seat fully. No checklist replaces that kind of attention.
Even the testing corner sits apart, behind a partial wall of sound-absorbing foam. There, a finished cell is charged briefly while a technician listens through a stethoscope for irregular crackling. A good cell produces a steady, almost inaudible hiss. A flawed one spits or pops in a way that’s easy to miss on a digital readout but obvious to a trained ear. That final listen still determines whether the unit gets a serial number or goes back to the bench.
Voltage Tuning Inside a Shielded Test Booth
Voltage tuning inside a shielded test booth is rarely a matter of simply turning a trimmer until a meter reads the highest number. The booth's metal shell blocks outside signals, but it also sets up standing waves and internal reflections that can sharpen or flatten the very response you are trying to adjust. Before making any changes, I let the device sit with the booth door closed for several minutes so that local temperature and RF conditions stabilize. A battery-powered multimeter or fiber-linked monitoring setup avoids introducing a new noise path through the access port.
Once the environment has settled, I adjust in small, deliberate increments rather than sweeping through a range. A plastic or ceramic tuning tool prevents the metal shaft of a standard screwdriver from shifting the circuit's behavior. Between each quarter-turn, I pause and watch the spectrum analyzer or receiver reading long enough to separate real changes from momentary fluctuations caused by booth reflections. If a capacitor or inductor has a coarse and fine adjustment, the coarse is set first with the door slightly ajar, then the fine is completed only after the booth is fully sealed.
The final pass always happens with every cable in its normal position and the door gasket compressed as it would be during an actual test. Even a small shift in how a cable lies along the inner wall can move a narrowband tuned frequency by several kilohertz. I note the exact physical position of each adjustable component and the corresponding output level, then take a reading through the booth's viewing window or a remote camera before opening the door. This last confirmation catches cases where the tuning tool's pressure or the act of closing the door introduced a slight mechanical drift.
The 72-Hour Continuous Run Every Unit Must Pass
Before any unit ships, it is bolted to a test bench and forced to run without interruption for three full days. The 72-hour window is not a suggestion or an estimate—it’s a hard gate. Power cycles, thermal swings, and sustained load are all part of the routine, and any fault, no matter how minor, sends the unit back for rework.
The point of the continuous run is to catch what short bench tests miss: solder joints that fatigue under repeated heating, firmware that drifts after hundreds of cycles, lubrication that breaks down once everything is hot. By hour 60 or 70, components that looked fine at hour 2 start to reveal themselves. That’s exactly when the test earns its keep.
Operators log temperature, current draw, vibration, and output stability at regular intervals. The data isn’t just pass/fail—it feeds back into assembly and calibration. A unit that survives all 72 hours with no intervention is cleared for final inspection, but the record of its run stays with the serial number.
Leak Checks and Final Inspection Under UV Light
Leak detection after a repair or installation isn't something you can rush. A tiny pinhole in a hose or a fitting that's just shy of tight can bleed refrigerant or fluid slowly, and by the time you notice the performance drop, you've already lost pressure and possibly caused more damage. That's why the final pass with a UV light matters so much. With the system charged and a fluorescent dye running through the lines, I'll kill the shop lights and sweep the UV lamp over every connection point, joint, seal, and hose end. The dye reacts instantly, glowing bright yellow-green wherever there's even a weep of leakage.
What makes this step stand out from a simple soap-bubble test is the visibility it gives on hidden or hard-to-reach areas. You can follow the entire circuit - compressor, condenser, evaporator, service ports, and the length of every hose - without having to guess where the leak might be. When a spot lights up, I wipe it clean with a lint-free cloth, run the system a few more minutes, and check again. If the glow returns, you've found the exact source. No false positives from leftover assembly lube, and no missed spots because the dye only shows up where there's an actual escape path.
After the leak check passes clean, the final inspection under UV light includes a close look at the surrounding areas for any stray dye that might have dripped during servicing. I also check that all caps are on, fasteners are torqued, and the UV dye hasn't contaminated belts, hoses, or electrical connectors. Only when the UV sweep comes back completely dark - no glow, no residue, no signs of seepage - do I consider the job done. It's a simple routine, but it catches problems that would otherwise show up as expensive callbacks later.
Boxing Up with Custom Foam and a Startup Guide
Getting the right foam insert isn't just about protection—it's about giving your product a proper stage. Start by measuring the object’s widest points and adding at least half an inch of clearance on all sides. Then, instead of guessing with generic pluck-and-pull foam, trace the outline onto paper first and use a hot wire or an electric knife for clean, angled cuts. You'll end up with a snug fit that doesn't rattle during shipping but still lets customers lift the item out without wrestling the foam.
Once the foam is shaped, seal the edges with a light spray adhesive or a thin layer of contact cement to prevent crumbling. For a more polished look, consider using a two-layer system: a soft top layer of egg-crate foam over a firmer base layer with the custom cutout. This adds a premium feel without much extra cost. If the box will be opened and closed repeatedly, reinforce the lid foam with a thin plastic sheet or fabric liner so it won't tear at the corners.
The startup guide should sit on top of the foam, visible the moment the box opens. Print it on slightly thicker stock than a standard manual—something with a matte finish that doesn't show fingerprints. Keep the first page focused on a single clear action, like plugging in the device or downloading the app, and use illustrations instead of long paragraphs for the rest. Tuck a small card under the foam edge with a QR code for troubleshooting, but don't mention it in the printed steps; let curious hands find it naturally. That little bit of discovery makes the unboxing feel more personal.
FAQ
The core components include stainless steel or ceramic dielectric tubes, high-voltage transformers, and specialized quartz glass. We also use food-grade silicone seals and anodized aluminum housings to resist corrosion from ozone exposure.
Each machine undergoes a calibration run in a sealed test chamber. Technicians adjust the voltage and airflow until the ozone concentration matches a reference sensor, typically within a 3% tolerance. Then they log the settings for that batch.
Sure. The process starts with cutting and shaping the metal enclosures, then moves to installing the dielectric cells and transformers. After wiring, the units go to a leak test, followed by a 48-hour burn-in period. Only then do they get labeled and packed.
Besides the ozone output calibration, we run high-voltage insulation tests, airflow pressure checks, and a simulated 500-hour lifespan test on random samples. Any unit that fails the leak test goes back for rework, not just adjustment.
Custom orders are routed through a separate small-batch line. Engineers swap in different transformers and electrodes based on the client's required grams per hour. The firmware is then flashed with custom duty cycles, and the unit gets an extended 72-hour test.
Robotic arms handle the repetitive coil winding and tube sealing, which reduces human error. But final assembly and calibration are still done by hand because the high-voltage connections need a careful touch and visual inspection.
Yes, the production floor has ozone scrubbers above each testing station to prevent gas buildup. Workers wear nitrile gloves and safety goggles, and all scrap metal and quartz are recycled through a certified partner.
It comes down to traceability. Every unit has a serial number that links to the full production record, including which batch of dielectric tubes and transformer came from which supplier. If a defect appears later, we can trace it within hours, not days.
Conclusion
Walking through this facility, the first thing that stands out is how much care goes into parts most people never see. Raw ceramic tubes are machined into exact electrode shapes, with tolerances checked at every station. The corona cells themselves are assembled by hand on a floor that feels unusually calm—no loud machinery, just focused technicians fitting components together. Once a cell is complete, it moves to a shielded booth where voltage is tuned and verified, ensuring the discharge pattern stays stable under real operating conditions.
Before any unit leaves, it faces a 72-hour nonstop run to catch failures that shorter tests miss. Then come leak checks and a final inspection under UV light, where even hairline cracks or residue become visible. Only after passing all of that does the machine get packed. Custom-cut foam holds every part in place, and a printed startup guide walks the customer through first use. It's a slow, deliberate process—but the result is an ozone machine that works right out of the box and keeps working long after.
Contact Us
Contact Person: Paul Luo
Email: [email protected]
Tel/WhatsApp: 0086-19966314501
Website: https://www.lufutatech.com